I am so excited for today's Monday Made It from 4th Grade Frolics!!

So after I saw this on Pinterest


So after I saw this on Pinterest
I thought, why would I spend $48 when it isn't in the colors or fonts I want and is missing some crucial things (for my classroom)?
So I headed over to Michaels with a coupon (of course) and picked up a canvas and some paint!


So I just used acrylic paint, only about $1.50 for each bottle, to cover my canvas.

This took forever, seriously about two days work plus a sliced finger. I printed out all of my headings in with my new cute Kevin and Amanda fonts, and went to cutting. I bought a special tracing wax paper at hobby lobby.
***Update: Jen asked me what kind it was and I thought I should probably post it!***
You can get it here if it isn't available in your area!
Usually I just use overhead sheets, but when I went out to my school it was closed :(

After an exhausting time cutting these out, along with a few mistakes along the way, I taped them on to the canvas using painters tape and used my white paint. I recommend using a small roller!

Here it is before I went in to do touch ups..


Here are some close ups AFTER touch ups:


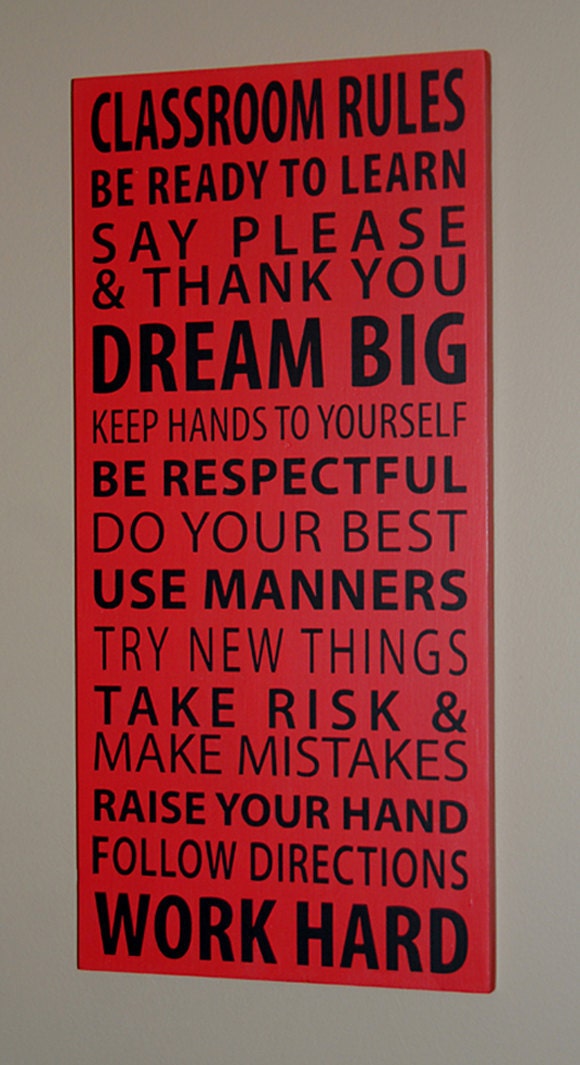
And the finished product!! Please let me know what you think!
I LOVE it!! I looks great! What kind of tracing paper did you get from Hobby Lobby? I {puffy heart} Kevin and Amanda's fonts :).
ReplyDeleteThanks! :) I used Wax-O stencil paper, it was really easy to work with! Their fonts are amazing, I'm in love!!
DeleteLooks fantastic! Great addition to the classroom!
ReplyDeleteThanks! I just visited your blog and started following it, another middle school teacher, yay! :)
DeleteCooler than anything else that's out there now...mind if I pin this?
ReplyDeleteLove your creativity, so I became a follower.
Would love to have you join me at my blog!
Nikki
uncommontothecore.blogspot.com
Thank you! I don't mind at all :) I will definitely check out your blog!
DeleteThanks, Brandi!
ReplyDeleteThat looks amazing! I think it was totally worth your time. I wish I had the patience to cut out all of those words.
ReplyDeleteLauren
http://thetravelingthirdgradeteacher.blogspot.com/
Thanks :) I'm definitely looking into cutting a die cutter after this experience, lol!
DeleteWow!! This is awesome!!
ReplyDeleteThank you!!
DeleteSO SO cute!!!! I love the fonts you used! That looks like it took forever to cut out though!! And I can't believe how great your letters turned out! Mine would probably be all jagged!
ReplyDeleteMolly
Lessons with Laughter
It did for sure! I was really concerned it would be jagged, but it turns out you just need the sharpest flipping x-acto knife you can find, which also means it will slice into your finger like butter when you aren't looking, lol!
DeleteYour sign looks great!
ReplyDeleteEmilyK
Wow! That's a keepsake, I can't imagine how time-consuming of a project this was, not to mention all the concentration and hand cramping it took to create those stencils yourself. You should start to sell yours online because it looks better than your original inspiration and who knows, maybe you can make a profit or two!
ReplyDelete:) Antonia @ forkin4th
Thank you so much, your comment absolutely made my day :) I am certainly thinking of selling them, as my friend now wants a sign for her new baby so I'll have another type of stencil to do! :) Thanks for visiting, I just went to your site and started following! :)
DeleteWow! That is so cool! Looks like all of your hard work paid off...Wish I had enough time left in the summer to take on such a task...
ReplyDeleteThanks for sharing!
~Sara~
Ramblings of a Deaf Ed Teacher's Mind...
I was so close to purchasing pre cut letters in different fonts, which would have shaved off about 6 hours on this project, so you could totally still do it!!
DeleteLooks fantastic - what great rules to live by!
ReplyDelete(Carpe diem is my word(s) of the year!)
My favorite movie ever, DPS!! :) Great words to live by!
DeleteI LOVE your sign!! I've wanted to make something kind of like that for awhile now!! I'm now your newest follower!
ReplyDeleteCyndi
Lacy's Letters
Thanks! And thanks for the follow! :)
Deletebeautiful
ReplyDelete